Nowadays, pretty much everyone has a wireless network connection set up at home. Your router’s wireless access point is connected to a certain channel, which connects you to a Wi-Fi network.
That said, if you live in an apartment building or densely populated area, you might experience frequent network timeouts, disconnection issues or an overall slow internet speed.
These issues are often caused by the large number of people attempting to connect to the internet, causing an overload of wireless signals using the same network channel.
In order to get the best possible Wi-Fi connection in your area, you’ll have to switch to a channel that either has no other users (or significantly fewer users) than the current channel you’re using.
In this step-by-step guide, I will show you how to improve your Wi-Fi connection by finding the best Wi-Fi channel for your router, for both PC and cell phone. I will then instruct you on how to set up your router in order to tune into that channel.
Let’s get started.

Check for the “RSSI” and “Noise” values.
RSSI stands for “Received Signal Strength Indicator.” It tells you how strong the connection between your device and a router is.
Noise, also “Noise Floor,” is the sum of all the noise sources and unwanted signals within the connection range. In this case, “Noise” stands for the number of other signals that might interfere with the signal being monitored.
Both values are always in negative numbers.
For RSSI, you’ll have to check for the highest number (the higher, the better). But, because they’re negative, it’s important to remember that “higher” will mean as close to zero as possible. For example, an RSSI of -45 is better compared to an RSSI of -70.
On the other hand, for “Noise,” you’ll need to look for the lowest number. Again, because these numbers are negative, the lowest number would be the one that’s farthest from zero. For example, -95 is better than -88.
To complete the calculation, we want to measure the difference between these two values. This is called the “SNR” - which stands for “Signal-to-Noise Ratio.”
Simply subtract the value of “Noise” from the “RSSI” value to get the SNR value.
For example, channel 13 has an RSSI of -49 and the noise is -95.
So, to calculate the SNR: (-49) - (-95) = SNR of 46.
Ideally, you want to have a high SNR ratio. The higher this number is, the better the Wi-Fi connection.
What’s the Difference Between 2.4 GHz and 5 GHz?
The major difference between a 2.4 GHz and a 5 GHz wireless connection is the range and bandwidth.
A 5 GHz wireless connection will provide a faster connection, which is most effective at covering shorter distances.
A 2.4 GHz wireless connection is more effective at covering farther distances, but might do so at a lower speed.
Note: a 5 GHz connection isn’t nearly as good as a 2.4 GHz connection at penetrating objects and walls. Also, in a densely-populated Wi-Fi area, it’s better to have a 2.4 GHz connection because “Noise” has more influence on a 5 GHz wireless connection.
How to Find the Best Wi-Fi Channel on Mac
The first thing you have to do is scan your area to identify all the available Wi-Fi networks. You can do that by running the “Network Diagnostics” on your Mac.
Follow the step-by-step explanation below:
Step #1 - Hold the “option” (alt) key and move your mouse to the top-right of your screen. Click the Wi-Fi connection icon.

Step #2 - Find “Open Wireless Diagnostics” in the drop-down menu.

Step #3 - A new window called “Wireless Diagnostics” will open.

Step #4 - The next window you will see is an overview of all the Wireless Access Points in range of your router.

Step #5 - In order to refresh the overview, tap “Scan Now.”

Step #6 - The diagnostics summary provides an overview of the analysis and which Wi-Fi channel is the best in the area for your router.
In the example, there are 9 networks in total. The summary box indicates that the best 2.4 GHz network available is channel 11.

However, if we take a closer look at the data in the image below, we can draw a different conclusion. For some reason, after I clicked “Scan Now,” channel 11 was no longer available on the list, likely due to an error. Hopefully, this is not something you’ll need to worry about.
Therefore, you’ll need to calculate the best SNR level to determine the best available channel.
For the SNR calculation, you need two data points.
Now, we calculate the sum of those two values: (-46) - (-99) = SNR of 53.
So, the SNR is 53, which makes channel 13 the best.

Note: you can also use a Wi-Fi scanner tool instead of the Wireless Diagnostics Scan.
Wi-Fi Scanner is a good tool, but it’s priced at $19.99 in the App Store. NetSpot is a free tool to scan for wireless networks in your area, and it has a multifunctional discover mode with visual graphs.
How to Find the Best Wi-Fi Channel on Windows
There are various software tools available for your Windows machine in order to figure out which Wi-Fi channel in your area is the best. You can find a few free software applications below:
- NetSpot, compatible with Windows 7, 8 and 10.
- Acrylic WiFi, compatible with Windows 7, 8 and 10.
- WiFi Analyzer, available in the Microsoft Store.
- WiFi Commander, exclusively for Windows 10.
All the Wi-Fi scanners listed above are powerful tools to scan your network area.
For the sake of this example I will go with WiFi Analyzer, because it’s easy to use and has a neat interface.
Step #1 - Go to the online Microsoft Store.
Step #2 - When you’re in the Microsoft Store, tap “Get the App” to start the download.

Step #3 - Install the application on your Windows machine. When the installation is completed, open the application.
Step #4 - When you open WiFi Analyzer, you’ll see its dashboard.
On the right side, you can select extra filters. I recommend not changing the default settings. The last 3 options are rather advanced options, which are not applicable for now.
The current channel of each connection is stated below the network’s name.

Step #5 - Click on “Analyze” in the dashboard. You will see a graph with visuals, indicating what networks are performing best and worst.
Below the graph, WiFi Analyzer leaves a recommendation based on the scan results. If the graph is too confusing, look to the bottom left - you’ll see the word “Recommend.” The channel noted below will be the optimal Wi-Fi channel to connect to. In this example, the tool recommends using channel 13.
However, we can also draw a different conclusion here. As we know, the closer RSSI is to 0, the better.
So, that makes CH1 (matthafner.com) the best channel, because -60 is closest to 0 of all the available Wi-Fi networks in the list.

How to Find the Best Wi-Fi Channel With Linux Command Line
Linux users have two options when it comes to detecting Wi-Fi channels: you can either run a command line in Terminal, or you can choose to download a more visually-enhanced tool, like WiFi Radar.
Installing software tools on Linux always takes a bit more effort compared to Windows and Mac. So, I recommend using the Terminal utility to scan for the best Wi-Fi network channel in your area.
Launch the Terminal and enter the following command line:
sudo iwlist wlan0 scan | grep Frequency | sort | uniq -c | sort -n
Example output would look like this:

The command line groups the results, so you can see how much each channel is used. The “sort -n” command will rank the channels in order of fastest to slowest: in this example, channel 3 is ranked first.
How to Find the Best Wi-Fi Channel on Android
Earlier in this guide, I recommended Wifi Analyzer for Windows users. I also recommend this tool for Android users, because the tool is also compatible and available for mobile devices.

Step #1 - Download and install Wifi Analyzer in the Play Store.
Step #2 - Launch the app to open the dashboard.


In the example, channel 11 appears to have the best statistics.
Step #3 - Check the dBm (signal strength) and the graph to visually compare all the available networks.
![]()
![]()
How to Find the Best Wi-Fi Channel on iPhone
Apple designed the architecture of iPhones in such a way that applications can’t communicate with each other, because strict security reasons prevent that.
Therefore, it’s impossible to perform a performance analysis of your Wi-Fi network with an iPhone.
It’s only possible if you jailbreak your iPhone, but to avoid that hassle, I highly recommend following one of the other options mentioned above to discover which channel is best for you.
That way, once you adjust your router (explained below), you can connect to the new channel - no fancy footwork with the iPhone necessary.
How to Change Your Router Settings to the Best Wi-Fi Channel
So, by now, you should have been able to successfully identify the best Wi-Fi channel in your area based on the signal strength, least users on a channel and width (2.4 GHz or 5 GHz).
Follow the next steps to enjoy a faster Wi-Fi connection:
Step #1 - Log into your router’s main dashboard.
If you don’t know how to log into your router’s dashboard, read my post for further instructions. Scroll down to the “Use the Data to Configure Router Settings” section to follow the steps.
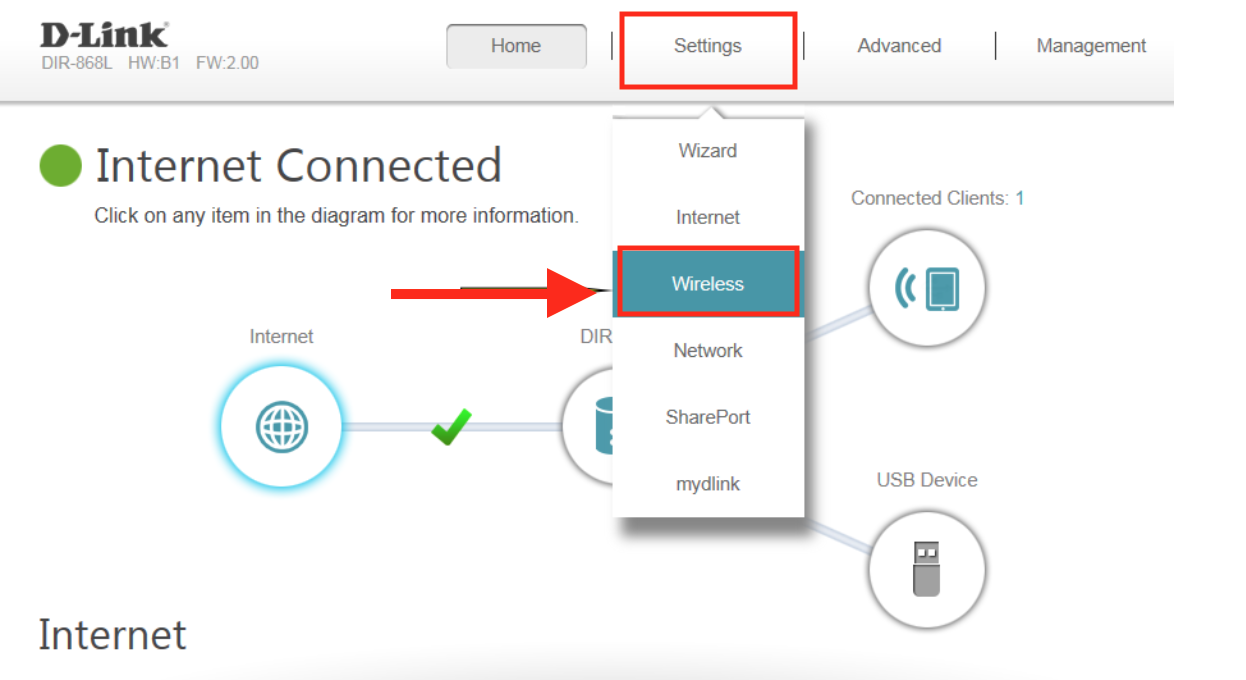
Step #2 - When you have successfully logged into your router’s dashboard, tap “Settings.” Under settings, find “Wi-Fi” or “Wireless.”
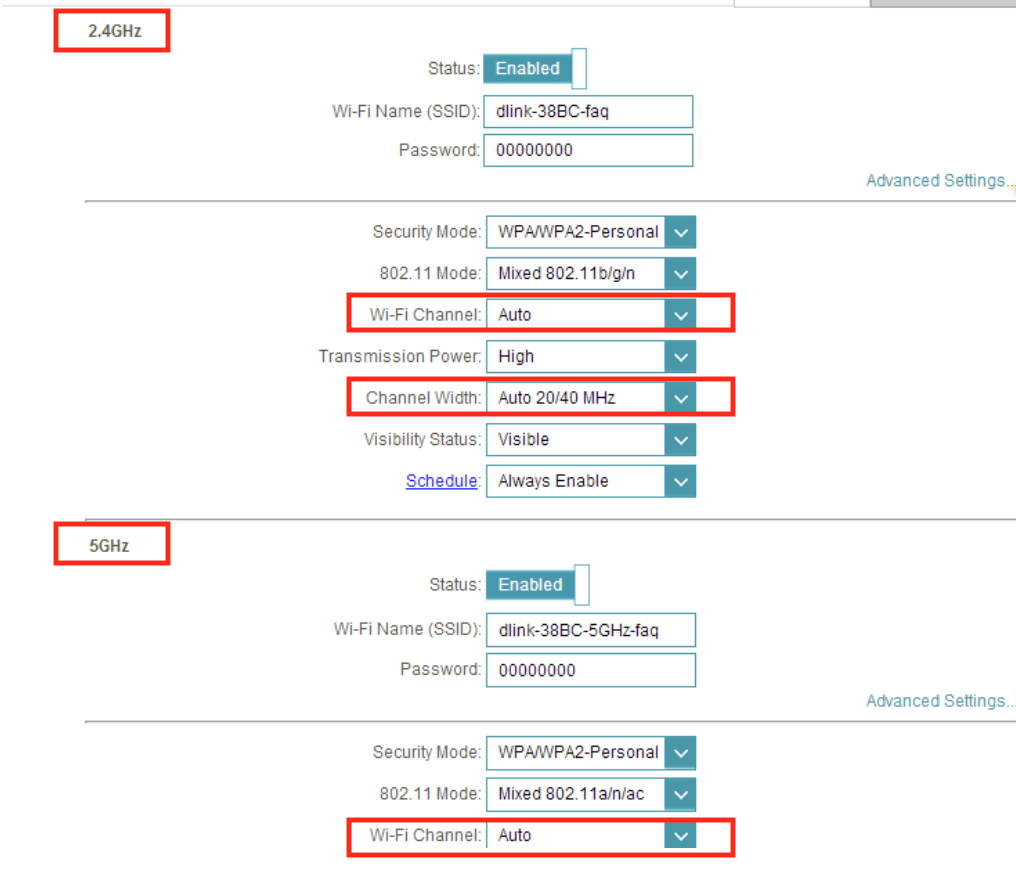
Step #3 - Next, it’s time to change the “Wi-Fi Channel.” Simply select the little arrow to fold out the drop-down menu and select the recommended channel based on your network analysis.
You have the possibility to select either the 2.4 GHz or 5 GHz channel. Remember, it’s only advantageous to go for a 5 GHz Wi-Fi channel if you live in a less-congested Wi-Fi network area, without any objects blocking the signal.
That’s all for now!
Reach Your Wi-Fi’s Full Potential
By following the steps above, you should be able to reach the full potential of your Wi-Fi network - especially if you live in a densely-congested Wi-Fi network area.
It would be a shame to suffer from annoyingly-slow internet speed. Connecting to a faster available Wi-Fi channel will provide the solution.
I hope you’ll enjoy a faster internet connection after reading this guide. Happy browsing!
from: https://pixelprivacy.com/resources/best-wi-fi-channel/
OCCOM—Optical Communication Expert
Occom is an Internet service provider dedicated to delivering faster fibre and mobile services and faster support. Occom has been praised by tens of thousands of satisfied residents and businesses, and our products have attained commendation from industry experts. As one of the fastest growing telcos endorsed by top global and Australian financial media, Occom has set the bar for exceeding Aussies’ expectations towards customer service. Occom’s young, passionate and professional team will keep on pushing the boundary for what is possible in the future.
Tel:1300 200 999


